Old cert management backup
Understanding Certificate Management
SSL certificates are used for encrypted communication between the CDN and clients.
To add an SSL certificate to your site, upload a certificate that you own, associate it with the site, and then publish the site.
Only one certificate may be associated with a site. If multiple hostnames are configured, ensure that the certificate includes all the hostnames.
Note: Your QC User is associated with an organization. When you or any other user within your organization uploads a certificate, it is added to a shared pool of certificates available to all members of your organization for associating with a site.
Supported Actions
Certificate Management supports the following actions:
Upload a Certificate - The Upload feature in the QC Services UI uploads the certificate and automatically associates it with the site. So if a certificate is already associated with the site, first unlink it, and then upload the new certificate. Otherwise, the Upload will fail.
If your site is already published, republish the site to activate the new certificate.
Associate a Certificate - Associate an uploaded certificate with a site.
Only one certificate can be associated with a site. If another certificate is already associated with the site, first unlink it.
Unlink a Certificate - Unlinks a certificate from a site.
Republish the Site - After updating, associating, or unlinking a certificate for a live site, it is necessary to republish the site to activate the changes.
Although a certificate is automatically associated with the site when it is uploaded via the QC Services user interface, uploading and associating are two distinct processes. If the certificate is ever unlinked from the site, the certificate is not invalidated, and the certificate remains in your organization's pool of certificates that are available for associating with a site.
Upload a Certificate
The Upload feature in the QC Services UI uploads the certificate and also automatically associates it with the site. Only one certificate may be associated with a site. If your site configuration includes multiple hosts, make sure that the certificate covers all the site hosts that are configured for secured traffic.
Note: An uploaded certificate is available to everyone in your organization for associating with a site.
To upload a certificate:
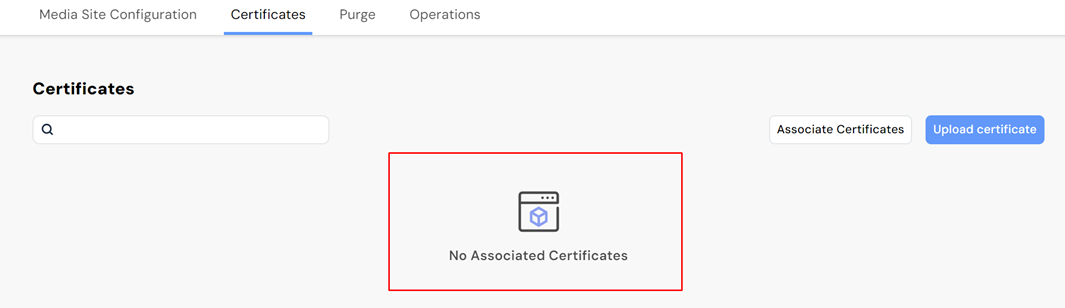
- Navigate to the My Media Sites page and select the site.
- Open the Certificates tab.
Until a certificate is associated with the site, No Associated Certificates is displayed.
- Select Add Certificate.
- Select Upload Certificate.
- In the Upload Certificate dialog, populate the following fields:
- Certificate: Upload or paste the certificate.
- Certificate Chain: Upload or paste both the certificate and the certificate chain in this field. This is critical for proper validation.
- Private Key: Upload or paste the private key. - Select Validate.
-
In the Upload Certificate dialog check the parameters and click Confirm.
The certificate is automatically associated with the site, and appears in the main Certificates page. -
If your site is already published, republish the site to activate the certificate.
Note: Although the certificate is automatically associated with the site when it is uploaded, uploading and associating are two distinct processes. If the certificate is ever unlinked from the site, the upload is not invalidated, and the certificate remains available for linking to a site, and visible on the Associate Certificates page.
Link a Certificate
When you upload a certificate through the QC Services user interface, it is automatically linked to the site that is open in the user interface. However, you also have the option to link an already uploaded certificate to a specific site, or you may need to link a different certificate to a particular site.
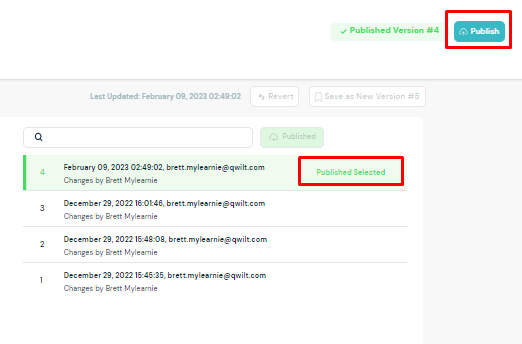
Currently, you link a certificate to a site as part of the publish workflow.
To link a certificate to a site:
1. Navigate to the My Media Sites page and select the site.
2. Select Publish, then in the Publish Site dialog, select the Select Certificate link.
3. Select from the list of available certificates and Save Changes.
Note: Associating a certificate with a site enables port 443 in addition to port 80.
Republish a Site
After updating, linking, or unlinking a certificate for a live site, it is necessary to republish the site to activate the changes.
To republish a site: